
Note: this is a contributed post by Jens Heine <binbash@gmx.net> – please reach out to him if there any questions or comments! And a big “thank you” from me (Rink) for your contribution!
This firmware modification is mainly inspired from another HOWTO from Rink’s blog where he hacked a FI9853EP.
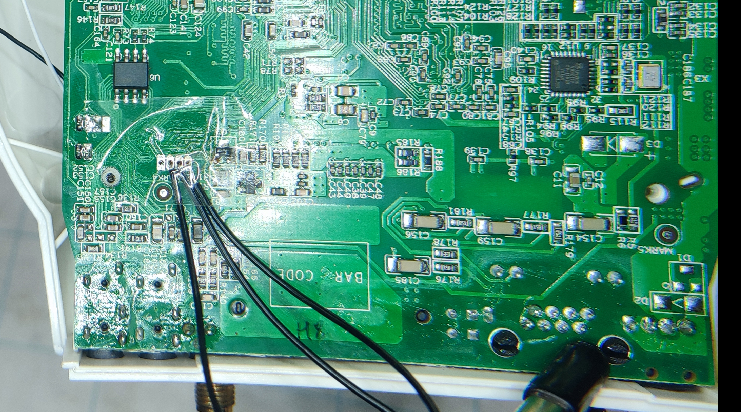
First get access to a TTY console on the mainboard of the cam. There are 4 contacts in the picture: RX, GND, TX.
Connect a usb-uart adapter to it and run picocom (or minicom or what you like)
First check which usb device is the one with dmesg and the connect. You will see the console output and can gather some information which will be very useful later on:
$ picocom -b 115200 -l -r --logfile `date +"%Y%m%d_%H%M%S"`.log /dev/ttyUSB0
U-Boot 2010.06 (Jan 25 2013 - 10:58:11)

DRAM:  256 MiB
NAND:  Special Nand id table Version 1.35
Nand ID: 0x00 0x00 0x00 0x00 0x00 0x00 0x00 0x00
No NAND device found!!!
0 MiB
Check spi flash controller v350... Found
Spi(cs1) ID: 0xC2 0x20 0x18 0xC2 0x20 0x18
Spi(cs1): Block:64KB Chip:16MB Name:"MX25L128XX"
In:    serial
Out:   serial
Err:   serial
Hit any key to stop autoboot:  0
16384 KiB hi_sfc at 0:0 is now current device
## Starting application at 0x82000000 ...
Uncompressing Linux... done, booting the kernel.
Linux version 3.0.8 (root@ubuntu) (gcc version 4.4.1 (Hisilicon_v100(gcc4.4-
290+uclibc_0.9.32.1+eabi+linuxpthread)) ) #29 Sun Jul 13 23:18:12 PDT 2014
CPU: ARM926EJ-S [41069265] revision 5 (ARMv5TEJ), cr=00053177
CPU: VIVT data cache, VIVT instruction cache
Machine: hi3518
Memory policy: ECC disabled, Data cache writeback
AXI bus clock 200000000.
Built 1 zonelists in Zone order, mobility grouping on.  Total pages: 48768
Kernel command line: mem=192M console=ttyAMA0,115200
But there is only a login prompt and I have no clue what the user/password is…
...
route: SIOCDELRT: No such process
adding dns 192.168.1.1
pppoe-stop: No PPPoE connection appears to be running
route: SIOCDELRT: No such device
cp: can't stat '/etc/resolv.conf.bak': No such file or directory
Login timed out Auto login as root ...
(none)
login:
 recvfrom: Connection refused
recvfrom: Connection refused
recvfrom: Connection refused
...
So we need to fix this. First we will need to know about the flash partitions or better the addresses.
This info comes somewhere in the boot messages (the lines that start with 0x00...):
Spi id table Version 1.22
Spi(cs1) ID: 0xC2 0x20 0x18 0xC2 0x20 0x18
SPI FLASH start_up_mode is 3 Bytes
Spi(cs1):
Block:64KB
Chip:16MB
Name:"MX25L128XX"
spi size: 0x16777216
chip num: 1
3 cmdlinepart partitions found on MTD device hi_sfc
Creating 3 MTD partitions on "hi_sfc":
0x000000000000-0x000000100000 : "boot"
0x000000100000-0x000000500000 : "kernel"
0x000000500000-0x000001000000 : "jffs2"
Fixed MDIO Bus: probed
himii: probed
Bingo. Now reboot that thing and hit a key when starting to interrupt u-boot. Now we have a u-boot prompt and can extract the jffs2 firmware to a TFTP server (that we have installed earlier on another machine in the network).
Let’s load the jffs2 partition to memory. Initialize the flash memory controller first:
hisilicon # sf probe 0
And copy the jffs2 data (in sum 0xb00000 bytes starting from 0x000000500000) to memory:
hisilicon # sf read 0x82000000 0x000000500000 0xb00000
Then set up out network environment to be able to access the TFTP server:
hisilicon # setenv serverip 192.168.1.42
hisilicon # ping 192.168.1.42
Hisilicon ETH net controler
MAC:   00-00-23-XX-XX-XX
UP_PORT : phy status change : LINK=DOWN : DUPLEX=FULL : SPEED=100M
UP_PORT : phy status change : LINK=UP : DUPLEX=FULL : SPEED=100M
host 192.168.1.42 is alive
And push the jffs2 data from memory to the server into a file called flash0
hisilicon # tftp 0x82000000 flash0 b00000
Hisilicon ETH net controler
miiphy_register: non unique device name '0:1'
miiphy_register: non unique device name '0:2'
MAC:   00-00-23-xx-xx-xx
UP_PORT : phy status change : LINK=UP : DUPLEX=FULL : SPEED=100M
TFTP to server 192.168.1.42; our IP address is 192.168.1.167
Upload Filename 'flash0'.
Upload from address: 0x82000000, 11.000 MB to be send ...
Uploading: #    [ Connected ]
################################        [ 2.888 MB]
################################        [ 5.752 MB]
################################        [ 8.616 MB]
###############...         11.000 MB upload ok.
Let’s have a look into the TFTP directory:
melvin@deeps:~$ l /srv/tftp/
insgesamt 47M
drwxrwxrwx 2 root   root   4,0K Sep 24 22:36 .
drwxr-xr-x 3 root   root   4,0K Sep  9 00:59 ..
-rw-rw-rw- 1 tftp   tftp    11M Sep 24 19:40 flash0
melvin@deeps:~$ file flash0
flash0: Linux jffs2 filesystem data little endian
That worked.
NOTE: I recommend to not only copy the jffs2 data but the whole flash data and save it to our TFTP server. When something goes wrong, we can restore the complete flash from the backup.
hisilicon # sf probe 0
hisilicon # sf read 0x82000000 0x000000000000 0x000001000000
hisilicon # tftp 0x82000000 flash_full 0x000001000000
If you have extracted the full firmware to a file called flash_full, you can restore it like this:
hisilicon # tftp 0x82000000 flash_full
hisilicon # sf probe 0
hisilicon # sf erase 0x000000000000 0x000001000000
hisilicon # sf write 0x82000000 0x000000000000 0x000001000000
Now we need a tool called Jefferson to extract the filesystem. Just get it from github:
git clone https://github.com/onekey-sec/jefferson.git
or install it with python3 pip:
pip install jefferson
melvin@deeps:~$ jefferson flash0
dumping fs to ./_foscam_fi9831w/bin/flash0/jffs2-root (endianness: <)
Jffs2_raw_inode count: 74
Jffs2_raw_dirent count: 74
writing S_ISDIR app
writing S_ISREG boot.sh
writing S_ISREG default.script
writing S_ISREG pkg_info
writing S_ISREG resolv.conf
writing S_ISDIR app/config
writing S_ISDIR app/diff_cn
writing S_ISDIR app/diff_cnen
writing S_ISDIR app/etc
writing S_ISDIR app/plugins
writing S_ISDIR app/ringtone
writing S_ISREG app/www.tar.xz
writing S_ISREG ipcLog.bin
writing S_ISREG app/zlib.tar.xz
writing S_ISREG app/config/ProcessListConfig.xml
....
writing S_ISREG app/zbin.tar.xz
----------
melvin@deeps:~$ l
insgesamt 12M
drwxrwxr-x 4 melvin melvin 4,0K Sep 26 22:48 .
drwxrwxr-x 4 melvin melvin 4,0K Sep 25 00:00 ..
-rw-rw-r-- 1 melvin melvin  11M Sep 24 19:47 flash0
drwxrwxr-x 3 melvin melvin 4,0K Sep 26 22:48 jffs2-root
After digging a bit around I decided to modify the file jffs2-root-mod/boot.sh. I appended this to the end after this:
 echo "Adding extra user melvin..."
 echo "melvin::0:0::/:/bin/sh" >> /etc/passwd
 telnetd &
Ok, put it all back together and create a nice jffs2 from the modified folder:
mkfs.jffs2 -l -e 8 -o jffs2_mod.mtd -r jffs2-root
I decided to create a small erase block size just in case the expected erase block size is below the default which is 64k. The new created filesystem is smaller than the extracted one but this is ok (padded in the end).
Now we can pull the firmware mod to our Foscam device:
hisilicon # tftp 0x82000000 jffs2_mod.mtd
Hisilicon ETH net controler
miiphy_register: non unique device name '0:1'
miiphy_register: non unique device name '0:2'
MAC:   00-00-23-xx-xx-xx
UP_PORT : phy status change : LINK=UP : DUPLEX=FULL : SPEED=100M
TFTP from server 192.168.1.42; our IP address is 192.168.1.167
Download Filename 'jffs2_mod.mtd'.
Download to address: 0x82000000
Downloading: #################################################
done
Bytes transferred = 9201348 (8c66c4 hex)
Nice, the file is in our Foscam memory. Let’s push it to the flash device.
Initialize the flash controller always first.
hisilicon # sf probe 0
Do not forget to erase the target space before writing:
hisilicon # sf erase 0x500000 0xb00000
Erasing at 0xc00000 -- 100% complete.
And now copy the fresh mod:
hisilicon # sf write 0x82000000 0x500000 0x8c66c4
Writing at 0xc00000 -- 100% complete.
Tension now, reboot the device and look what happens…
usbcore: registered new interface driver rt3070STA
ptz_init start ptz_state[1],HorPos[-1],VerPos[100000]
setup ptz gpio success
setup zoom gpio success
ptz_init end ptz_state[1],HorPos[-1],VerPos[-1],flag[0]
Hisilicon Watchdog Timer: 0.01 initialized. default_margin=5 sec (nowayout= 0, nodeamon= 0)
mkdir: can't create directory '/mnt/mtd/app/modules': File exists
mkdir: can't create directory '/mnt/mtd/app/modules/extdrv': File exists
Vertical self test complete,horizen_phase[4],flag[0]
tar: can't open '/mnt/mtd/app/patch/patch.tar.xz': No such file or directory
set rtc time to system time
Adding extra user melvin...
Auto login as root ...
(none) login: killall: devMng: no process killed
killall: codec: no process killed
killall: UDTMediaServer: no process killed
As we can see, our user has been added 🙂 And the telnet server has been started also!! Let’s try it:
melvin@deeps:~$ telnet 192.168.1.166
Trying 192.168.1.166...
Connected to 192.168.1.166.
Escape character is '^]'.
(none) login: melvin
You are welcomed by FOSCAM R&D.
# id
uid=0(root) gid=0(root) groups=0(root)
# pwd
/
# ls -alh /
drwxr-xr-x   20 root     root           0 Sep 12 20:30 .
drwxr-xr-x   20 root     root           0 Sep 12 20:30 ..
-rw-------    1 root     root          17 Sep 12 20:30 .ash_history
drwxrwxr-x    3 1000     1000           0 Jan  1  1970 bin
drwxr-xr-x    2 1000     1000           0 Jul 14  2014 boot
drwxr-xr-x    5 1000     1000           0 Jan  1  1970 dev
drwxr-xr-x    6 1000     1000           0 Sep 12 20:29 etc
drwxr-xr-x    2 1000     1000           0 Jul 14  2014 home
lrwxrwxrwx    1 1000     1000           9 Jul 14  2014 init -> sbin/init
drwxr-xr-x    2 1000     1000           0 Jan  1  1970 lib
lrwxrwxrwx    1 root     root          11 Jul 14  2014 linuxrc -> bin/busybox
drwxr-xr-x    2 1000     1000           0 Jul 14  2014 lost+found
-rwxr-xr-x    1 1000     1000        1.3K Jan 31  2013 mkimg.rootfs
-rwxr-xr-x    1 1000     1000         431 Jan 31  2013 mknod_console
drwxr-xr-x    6 1000     1000           0 Jan  1  1970 mnt
drwxr-xr-x    2 1000     1000           0 Jul 14  2014 nfsroot
drwxr-xr-x    2 1000     1000           0 Jul 14  2014 opt
dr-xr-xr-x   59 root     root           0 Jan  1  1970 proc
drwxr-xr-x    2 1000     1000           0 Jul 14  2014 root
drwxrwxr-x    2 1000     1000           0 Jul 14  2014 sbin
drwxr-xr-x    2 1000     1000           0 Jul 14  2014 share
drwxr-xr-x   11 root     root           0 Jan  1  1970 sys
drwxr-xr-x    4 1000     1000           0 Sep 12 20:29 tmp
drwxrwxr-x    7 1000     1000           0 Jan  1  1970 usr
drwxr-xr-x    3 1000     1000           0 Jul 14  2014 var
Bingo!